
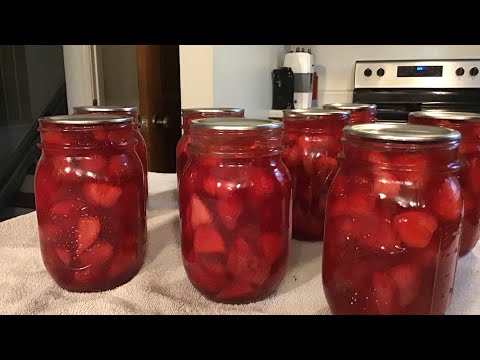
Canning strawberry pie filling is a great way to enjoy the sweet and tart flavors of summer strawberries all year long. This guide will walk you through the basics of canning strawberry pie filling, from preparing the ingredients, to assembling the jars, to processing and storing them. With a few simple steps you can have your own delicious homemade strawberry pie filling that you can enjoy any time.Ingredients:
– 4 cups of fresh or frozen strawberries, hulled and sliced
– 1/2 cup granulated sugar
– 2 tablespoons cornstarch
– 2 tablespoons freshly squeezed lemon juice
– 1/4 teaspoon ground cinnamon (optional)
Instructions:
1. In a medium saucepan, combine the strawberries, sugar, cornstarch, lemon juice, and cinnamon. Stir until everything is evenly combined.
2. Place the saucepan over medium heat and bring the mixture to a boil. Boil for 3 minutes while stirring constantly.
3. Reduce the heat to low and simmer for 10 minutes until the filling has thickened and the strawberries are tender and soft.
4. Allow the filling to cool completely before using it as a pie filling or topping.
Preparing the Strawberries
Preparing strawberries is an easy and quick task that can be done in a few simple steps. First, rinse the berries with cold water to remove dirt and debris. Then, cut off the hulls or green tops of the strawberries. Finally, cut the strawberries into slices or chunks, depending on how you plan to use them.
It’s important to use cold water when rinsing the berries as warm water will make them too soft and mushy. To remove all dirt and debris from the strawberries, you may also want to submerge them in a bowl of cold water for a few minutes before rinsing.
To cut off the hulls or green tops of the strawberries, hold each berry with one hand and use kitchen shears to snip off the top. Be sure not to cut too deep into the flesh of the fruit as this will cause it to become mushy and spoil quickly.
Once you’ve removed the hulls, you can cut up your strawberries any way you like. For pies or salads, slicing is usually best; for smoothies or sauces, chunking works well; for jams or jellies, mashing is often used; and for garnishes or decorations, halving can be done. Just remember that each method has its own unique purpose so choose one that best suits your needs!
Choosing the Right Type of Sugar
Sugar is an essential part of many recipes, but there are many different types of sugar available. It can be confusing to know which type of sugar to use for a particular recipe. When it comes to baking, some recipes call for granulated sugar, while others might require caster sugar or powdered sugar. Knowing the differences between each type of sugar can help you choose the right one for your recipe.
Granulated sugar is the most common type of sugar used in baking. It is made from either cane or beet sugar and has a coarse texture and light golden color. It is most commonly used in cookies, cakes, quick breads, and other baked goods where a light texture is desired. Granulated sugar can also be used as a topping for muffins, scones, and other desserts.
Caster sugar is finer than granulated sugar and has a finer texture and lighter color. It dissolves quickly and is often used in meringues, custards, creams, and icings. Caster sugar helps make these desserts light and fluffy.
Powdered or confectioners’ sugar is made by grinding granulated or caster sugars until they become powdery in texture. It contains a small amount of cornstarch to prevent clumping and has a smooth texture that makes it ideal for frostings, glazes, and toppings. It can also be used to make sweet sauces such as caramel sauce.
When choosing the right type of sugar for your recipe it’s important to consider the flavor profile you’re trying to achieve as well as the desired texture. Granulated sugars will provide more sweetness with less flavor than caster or powdered sugars which can add subtle flavor notes depending on their source (cane or beet). Powdered sugars are best when you want something light and airy while caster sugars are best when you need something with more body such as meringue or custard-based desserts.
No matter what type of recipe you’re making it’s important to understand the differences between each type of sugar so that you can choose the right one for your specific needs. With a little knowledge you can ensure that your baked goods turn out delicious every time!
Gathering the Ingredients
Making a delicious homemade syrup requires gathering the right ingredients. For a basic syrup, you will need equal parts of white sugar and water. If desired, you can also add a few drops of food coloring or flavoring extract to give your syrup some extra flair. Make sure to measure out the ingredients carefully; too much sugar can make your syrup overly sweet, while too little can make it too thin.
Heating the Mixture
Once all of your ingredients are measured and ready to go, it’s time to heat them up. Place the sugar and water in a medium saucepan, stirring often until all of the sugar is dissolved. Then turn up the heat and bring the mixture to a boil. As it boils, you may notice some foam forming on top; simply skim this off with a spoon or ladle and discard.
Reducing Heat
Once your mixture has reached a full boil, reduce the heat until it is at a low simmer. Stir occasionally as it simmers for about 10-15 minutes. At this point, you should start seeing your syrup thicken slightly as it cooks down.
Testing for Done-ness
To test if your syrup is done, take a spoonful of it and pour it onto a plate or shallow dish. Let it cool for a few minutes before touching or tasting; if the syrup remains thick and syrupy rather than running off of the plate or dish, then it’s ready! Otherwise, continue simmering until desired thickness is achieved.
Storing Your Syrup
Once cooled completely, transfer your homemade syrup into an airtight container or jar. It should last for several weeks when stored properly in either the refrigerator or at room temperature. Enjoy!
Adding Thickener to the Syrup
Making syrup is a relatively simple process, but there are a few steps that need to be followed closely in order to get the desired consistency and flavor. One of the most important steps is adding thickener to the syrup. This is especially important if you are making thicker syrups such as maple or molasses. Thickeners help bind the syrup together, making it easier to pour and keep its shape when it cools.
The most common thickeners used for syrups are cornstarch, arrowroot powder, or tapioca starch. Cornstarch is probably the most widely used thickener for syrups because it is inexpensive and easy to find. It also adds a slight sweetness to the syrup which can be beneficial if you are looking for a sweeter flavor. Arrowroot powder and tapioca starch can also be used as thickeners but they tend to be more expensive than cornstarch and can be harder to find in some areas.
To use cornstarch as a thickener for your syrup, you will need to mix it with an equal amount of cold water before adding it to the hot syrup mixture. This helps prevent lumps from forming in your syrup when you add it in. Once the cornstarch has been fully dissolved in water, slowly stir it into your hot syrup mixture until fully combined. Allow your syrup mixture to simmer for 5-10 minutes while stirring occasionally until it has reached your desired thickness.

Choosing the Right Starch Thickeners
Making a dish that has the perfect consistency is an art. Many recipes rely on using a starch thickener to get the desired texture. When it comes to selecting the right starch thickener, it is important to be aware of what is available and how they differ from one another.
Starch thickeners are typically derived from corn, wheat, tapioca, potato, or arrowroot. Cornstarch is by far the most common type used in cooking and it has a neutral flavor. It also works well with acidic ingredients such as lemon juice and vinegar. Wheat flour is another popular starch thickener and it has a slightly nutty flavor which can be desirable in some dishes. Tapioca starch is great for adding shine and gloss to dishes, while potato starch helps to create light and fluffy textures. Arrowroot is known for creating a glossy finish while providing excellent clarity to sauces and soups.
When using any type of starch thickener, it is important to remember that they all have different characteristics and will react differently when exposed to heat or other ingredients. For example, cornstarch should not be added directly to liquid as it will clump up and not dissolve properly. Instead, it should be mixed with a small amount of cold liquid before being added to hot liquid in order to ensure proper dissolution. Additionally, wheat flour should not be cooked for too long as this can result in an unpleasant starchy flavor.
It is also important to note that some starches are better suited for certain types of dishes than others. For instance, cornstarch works well for gravies and sauces but should not be used in fruit pies since it can become soggy when exposed to the high moisture content of fruits like apples or cherries. Similarly, wheat flour works well for baking cakes but may make sauces overly thick if too much is used.
In conclusion, selecting the right starch thickener depends on what type of dish you are making as well as the desired texture and consistency you wish to achieve with your recipe. Knowing how each type reacts when exposed to heat or other ingredients can help you make an informed decision that will yield delicious results every time!
Bringing the Syrup and Fruit Together
Making a delicious syrup and fruit combination is easier than you think! All it takes is some simple ingredients, a bit of time, and a little creativity.
First, you’ll need to decide what type of syrup you’d like to use. There are many different kinds of syrups available, from store-bought varieties to homemade concoctions. Consider the flavor profile you’re trying to achieve with your syrup and fruit combination before selecting your choice.
Next, you’ll need to choose your fruit. Fresh fruits are always best, but if you don’t have access to them, frozen fruits can be used as well. You can also use canned fruits if that’s all you have available. Make sure to select fruits that will pair well with the type of syrup you’ve chosen.
Once your ingredients are gathered, it’s time to start creating your syrup and fruit combination! Start by heating the syrup in a pot on the stove until it reaches a gentle simmer. Add in the fruit of your choice and stir gently until everything is evenly mixed together. Allow the mixture to cook for a few minutes until the flavors meld together nicely.
When everything is ready, pour the mixture into an airtight container or bowl for storage. Your syrup and fruit combination can then be enjoyed whenever desired! Use it as a topping for ice cream or waffles or even just eat it by itself as a tasty snack – whatever suits your fancy!
No matter how you decide to enjoy it, this simple but delicious syrup and fruit combination will make any meal special!
Adding Other Ingredients for Flavor and Texture
Cooking is an art form, so it’s no surprise that recipes often call for ingredients beyond the main dish. In addition to adding flavor and texture to a dish, these “extras” can also provide nutrition. For instance, adding vegetables to a dish not only adds crunch or color but also increases the nutrients in the meal. Similarly, adding nuts or seeds can provide healthy fats and protein.
When it comes to ingredients that add flavor and texture, there are many options. Herbs and spices are a great way to add complexity and depth of flavor without adding fat or calories. Consider using fresh herbs like basil, cilantro, oregano, rosemary or thyme to enhance the flavor of your dish without overpowering it. Dried herbs like oregano, thyme and rosemary can also be used in recipes; however, they tend to be more concentrated than fresh herbs so use them sparingly.
In addition to herbs and spices, other ingredients such as citrus zest or juice can help brighten up a dish with added flavor and acidity. Citrus fruits like lemons, limes and oranges can be used both as garnishes as well as ingredients in recipes. Similarly, vinegars such as white wine or balsamic vinegar can add a bright note of acidity that enhances the overall flavor of a dish.
For added texture, consider using nuts or seeds in your recipes such as almonds, walnuts or sesame seeds. Nuts and seeds can also provide healthy fats such as monounsaturated fatty acids (MUFAs) which are beneficial for heart health. They can also be used whole as garnishes or chopped into smaller pieces for use in cakes or cookies for extra crunchiness.
Finally, don’t forget about other starches like breadcrumbs or crackers that offer great crunchy texture along with some extra nutrition from whole grains. Breadcrumbs are often used as a topping on casseroles while crackers are commonly used as crumb coatings for fried foods like fish sticks or chicken tenders.
By experimenting with different ingredients when cooking you will inevitably discover new flavors combinations that you never thought possible! Don’t hesitate to get creative with your cooking – after all there’s no wrong way to make something delicious!

Conclusion
Making your own canned strawberry pie filling is a great way to enjoy this delicious dessert all year round. Using the freshest ingredients and following the simple steps outlined in this guide, you can make your own strawberry pie filling that’s healthy, tasty and sure to please. Making your own canned strawberry pie filling is also a great way to save money and be more self-sufficient. With some basic knowledge and a bit of time, you can easily enjoy the great taste of homemade strawberry pie filling any time of the year.
For those who are new to canning, making your own strawberry pie filling is an excellent way to get started. With just a few simple steps, you can easily make your own delicious canned strawberry pie filling that everyone will love. So why not give it a try? You won’t regret it!