
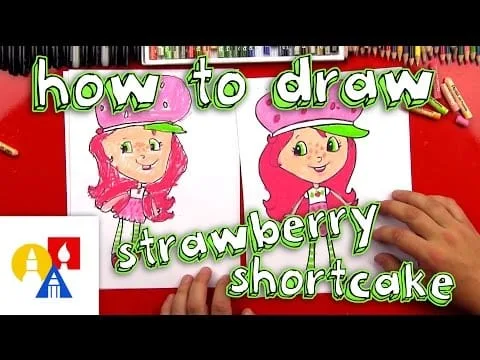
Strawberry Shortcake is a beloved cartoon character, and drawing her can be a fun and creative activity for people of all ages. Whether you are an experienced artist or a novice, this tutorial will guide you through the steps of drawing the delightful Strawberry Shortcake. With some patience and practice, you will soon be able to draw your own version of the classic character. So grab your pencils and paper, and let’s get started!1. Start by drawing the shape of Strawberry Shortcake’s head. Draw a large circle and add a curved line on each side for her cheeks.
2. Add two smaller circles for her eyes and draw an upside down “U” shape for her nose.
3. Draw two small semicircles above her eyes for her eyebrows and add a small curved line below the nose for her mouth.
4. Draw a curved line extending from the top of Strawberry Shortcake’s head, down to her shoulder and then out towards the side to make her arm. Make sure to leave enough room at the end of the arm so that you can draw her hand later on.
5. Add two lines extending downwards from each side of the arm to form her legs and feet. You can draw small circles in between the lines to indicate toes, if you wish!
6. Now draw Strawberry Shortcake’s dress by drawing an oval shape starting just above her waistline and extending down below where you drew her feet earlier on in Step 4.
7. To finish things off, add some details like curly hair, flowers or other accessories to make your drawing of Strawberry Shortcake unique!
Start with Drawing the Head
When learning to draw, one of the most important things to master is drawing the human head. The head is the foundation of all other aspects of drawing, and mastering its structure and proportions can help you to create realistic drawings. Before you start drawing, it’s important to understand the anatomy of the human head and how it’s put together. It’s also helpful to sketch out some basic shapes first before adding details.
The head can be broken down into two basic shapes – an oval for the top half and a circle for the bottom half. These shapes will form a basic outline for your drawing, which can then be built upon with more detail such as eyes, nose, mouth, ears and hair. It’s important to remember that no two heads are alike – everyone has different features and proportions that need to be taken into consideration when drawing them accurately.
When constructing your drawing from these basic shapes, it’s also important to consider other aspects such as perspective and proportion. Perspective is one of the most difficult concepts for beginners but it plays an essential role in creating realistic drawings. Proportion is also key – make sure that each feature is in scale with each other so that your final portrait looks realistic.
Finally, remember that practice makes perfect when it comes to drawing the human head! Keep practicing until you feel confident enough with your technique, then start experimenting with different styles and techniques to find what works best for you!
Create the Neck and Shoulders
Creating the neck and shoulders of a garment is an important step in constructing garments. It can be a complicated process, but with patience and practice, you can create a beautiful neckline that will complete your garment. To begin, measure the neck opening of the garment and add 1 inch for ease. Cut a strip of fabric that is twice as long as the measurement plus 1 inch. Fold the fabric in half lengthwise and press it flat. Next, turn under 1/4 inch along each short end and sew in place to create a finished edge. Then, pin the strip around the neckline of the garment with raw edges even. Sew the strip in place using a zigzag stitch on both sides of the fabric. Finally, press the seam allowance up towards the neckline to finish your neckline construction.
Creating shoulders for your garment is also an important step in constructing garments. Measure each shoulder seam from armhole to armhole and add 1/2 inch for ease. Cut two strips of fabric that are twice as long as each shoulder measurement plus 1/2 inch. Fold each strip in half lengthwise and press it flat before turning under 1/4 inch along each short end and sewing in place to create finished edges. Pin each strip along one shoulder seam at a time with raw edges even before sewing in place using a zigzag stitch on both sides of the fabric. Finally, press seam allowances towards shoulder seams to finish your shoulder construction.
The Face
The face is an important part of our body. It is the first thing people notice about us and it is one of the most expressive parts of our body. The face can tell a lot about a person without them even saying a word. It can show whether someone is happy, sad, angry, or tired. It can also reflect one’s age and health. The face is also an important part of how we communicate with others. We use facial expressions to convey our feelings and emotions, as well as to react to the emotions of others.
The Eyes
The eyes are often considered to be the windows to the soul. They are usually the first feature that people notice when they look at someone’s face. Eyes come in many different colors and sizes, but they all have one thing in common: they can express a wide range of emotions. From joy and excitement to sadness and fear, eyes can say a lot without words. They can also be used for communication between two people through eye contact or facial expressions.
The Nose
The nose is an important part of our face that helps us to smell things around us. It also helps us to breathe properly and keeps us healthy by filtering out impurities in the air we breathe in. Noses come in many different shapes and sizes, from small button noses to long Roman noses. Some noses are more prominent than others, but no matter what shape or size it is, it plays an important role in the overall composition of the face.
The Mouth
The mouth plays several roles on our faces: it helps us communicate with others by forming words; it helps us eat; and it helps express emotion through smiles and frowns. The mouth consists of several components such as lips, teeth, tongue, jawbone, cheeks, and palate which work together to help us speak clearly and comfortably as well as eat food properly without choking or having difficulties chewing or swallowing food items down correctly .
Sketching the Hair
Sketching the hair can be a daunting task, but with the right techniques it can be easy and fun. The key is to start with basic shapes and then add details. First, identify the shape of the head – oval, round, or square – and draw an outline of it. Then draw a line down the middle of the head for symmetry. After that, decide on basic areas for the hair – bangs, sides, back, etc. – and sketch in some basic shapes to indicate them.
Once you have all of your basic shapes in place, you can start adding details like individual hairs and highlights. Using small strokes of your pencil or brush make sure to give your lines direction so that they look like hair rather than random squiggles. If you are drawing straight hair you can use light lines to indicate each strand or darken them where they overlap for more texture. For curly hair use short strokes radiating outwards from a central point to create volume and texture.
When you are finished sketching in all of your details it’s time to add shadows or highlights depending on how realistic you want your image to look. You can use a variety of shading techniques such as cross-hatching or stippling to create depth. Finally, erase any unnecessary lines and enjoy your finished sketch!
Draw Arms and Hands
Drawing arms and hands can be a difficult task to master. It takes patience and practice to get it right. However, there are some key points that can help you along the way. The first step is to understand the anatomy of the arm and hand, as this will help you draw them accurately. You should look at how each joint works together and how they move in relation to one another. This will give you an understanding of how everything fits together, which will be invaluable when it comes time to draw.
Once you have a grasp on the anatomy, it is important to draw with proportion in mind. You should pay attention to the length of each joint in relation to one another and make sure that everything is drawn at the correct scale. This may take some trial and error, but if done correctly it can really bring your drawings to life.
After getting the proportions right, it is time for details such as wrinkles and folds in the clothing or skin texture on the hands and arms. Paying attention to these small details can make or break a drawing, so take your time while adding them in. Referencing real-life objects or photographs can also be helpful while drawing arms and hands, as this will give you an idea of how light interacts with different textures or shapes.
All in all, drawing arms and hands may seem like a daunting task at first, but with practice it can become much easier over time. It may take some trial and error before you are able to get them just right, but keep practicing until you feel confident about your drawings!
The Dress
The dress is a type of clothing worn by women. It is typically made from light fabrics like cotton, silk and chiffon and is usually knee length or longer. Dresses are usually worn with accessories such as jewelry, shoes and purses. There are different styles of dresses, such as casual, formal and evening wear. Depending on the occasion, different types of dresses can be worn.
Design
When it comes to dress design, there are many options available. The design of a dress can be simple or intricate depending on the fabric used and the details desired. A dress may have a fitted bodice with a full skirt or an A-line style skirt. It may also include ruffles, pleats or lace accents for a more feminine look. The neckline can vary from high neck to scoop neck to halter necklines for more versatile styling options.
Colors & Patterns
Dresses come in a variety of colors and patterns such as floral prints, stripes or polka dots for fun style options that stand out from the crowd. Bright colors like reds, blues and greens are perfect for summer days while muted tones like gray and navy are great for cooler weather seasons. Neutral tones like black, brown and ivory are timeless classics that can easily be dressed up or down depending on the occasion.
Fabrics
The fabric used to make dresses can vary greatly depending on the season and occasion they are intended for. Lightweight fabrics like cotton and linen work well in warmer temperatures while heavier fabrics like wool and velvet are perfect for chillier months. For special occasions such as weddings or cocktail parties, luxurious fabrics like silk or satin add an air of elegance to any look.
Fabric
The dress is expertly crafted from a luxurious Italian silk blend fabric for a beautiful finish and soft, smooth feel. It is lightweight and breathable, perfect for warmer days and nights. The fabric also has a subtle sheen, adding an extra touch of elegance to the design.
Design
The design of the dress is timeless yet modern, with a classic silhouette and simple lines that flatter the body. The waistline is slightly cinched to create a flattering shape, while the skirt flares out slightly for an elegant look. The dress features a subtle v-neckline with delicate lace detailing along the neckline and sleeves for an added touch of femininity.
Color
The dress comes in an array of colors, from classic black to bright white and everything in between. The color palette includes both muted tones as well as bold jewel tones to suit any occasion or style preference.
Detail
The dress also features intricate pleating along the skirt for added texture, as well as delicate pearl buttons at the back for closure. There are small slits on either side of the skirt, allowing for more movement and comfort when walking or dancing. A hidden pocket on one side adds functionality without detracting from the overall look of the dress.
Conclusion
Drawing Strawberry Shortcake is a fun and easy art project that can be enjoyed by people of all ages. It is a great way to practice your art skills while creating a cool character to add to your portfolio. By following the simple steps outlined in this article, you can create an awesome drawing of Strawberry Shortcake in no time. With some practice, you will be able to draw her perfectly and impress everyone with your artistic ability.
To recap, drawing Strawberry Shortcake involves sketching out the basic shape of her figure, then adding details like her facial features and hair. After that, you can color in the drawing and make it look more realistic with shading techniques. With a few simple tips and tricks, anyone can learn how to draw this classic cartoon character with ease!

