
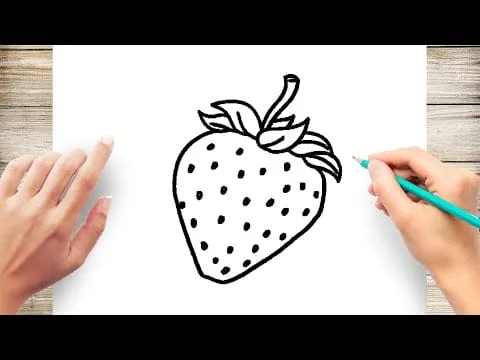
Drawing strawberries is a fun and easy project even for the beginner artist. In this tutorial, you will learn how to draw strawberries step by step. With a few simple supplies and a bit of patience, you’ll soon be sketching realistic-looking strawberries in no time! All you need is a pencil, paper, eraser, and colored pencils or markers. So grab your supplies and let’s get started!Step 1: Draw a circle shape with a point at the bottom.
Step 2: Add two curved lines on the sides of the circle to create the leaves.
Step 3: Draw a few lines for texture on the leaves and around the circle.
Step 4: Draw small circles inside the main circle to create seeds.
Step 5: Add some detail lines to give your strawberry some definition.
Step 6: Color in your drawing using red and green for the strawberry and leaves respectively.
Gather Supplies
When planning a move, it is essential to gather the necessary supplies first. This includes boxes, tape, labels and markers, packing material such as bubble wrap and newspaper, and a truck or other means of transportation. It can often be helpful to have friends or family members on hand to help with the move. Moving blankets, straps and furniture pads can also make the process smoother by protecting furniture from damage while it is in transit.
It can be helpful to purchase supplies in advance so that everything is ready for the day of the move. Boxes should be of sufficient size and strength to carry heavier items such as books or appliances. Packing materials like bubble wrap can help protect fragile items during transport, while labels and markers make it easier to keep track of what is in each box during the move.
It is also important to have enough transportation available for moving day. A truck may be necessary for larger moves while smaller moves may require only a car or van. If renting a truck or vehicle, it is important to book it well in advance so that it will be available on moving day.
Introduction
Sketching the outline of an idea or a concept is an essential part of the creative process. It helps to crystallize thoughts, organize information and identify key points. It helps to give structure to ideas and develop them further. Sketching the outline of an idea can also help to identify any gaps in understanding and give a better overall picture of the concept.
The Benefits of Sketching Outlines
Sketching the outline of an idea has many benefits. It helps to make ideas clearer, more understandable and easier to remember. It allows for greater flexibility in changing and adapting ideas as they evolve and grow. Sketching an outline also gives structure to ideas, making them easier to communicate effectively with others. Finally, sketching outlines can help identify weaknesses in understanding or gaps that need further exploration.
Tools for Sketching Outlines
There are many tools available for sketching outlines. Pen and paper are the most traditional tools for sketching outlines, but modern technology has given us many other options such as digital whiteboards, online collaboration tools such as Google Docs or Microsoft Word, mind mapping software, flow charts and more. All these tools can help to make sketching outlines easier and more efficient.
Using Outlines Effectively
To use outlines effectively it is important to start with a clear goal in mind. Ask yourself what you want to achieve with your outline – do you want it for brainstorming purposes or something more concrete? Once you have identified your goal you can then create your outline accordingly: choose colours, shapes or symbols that will help you better understand your concept or idea; structure your information so that it is easy to read; use arrows or other symbols to indicate relationships between different elements; add details when needed; etc.
Conclusion
Sketching the outline of an idea is an important part of the creative process that can help bring clarity and structure to concepts and ideas. There are many tools available which make this task easier – from pen and paper through to sophisticated online collaboration systems – so there’s no excuse not start sketching today!
Create a Rough Sketch
Creating a rough sketch is an essential first step in drawing. It helps you to get the basic shapes and proportions of the object right, and serves as a template for adding details. Start with basic shapes like circles, rectangles, or ovals. For example, if you are drawing a face, start with an oval for the head shape and then draw circles for eyes and simple rectangles for the nose and mouth. You can also add a few simple lines to define the facial features such as eyebrows or cheekbones. Once your basic sketch looks good, you can move on to adding more details.
Add Shading & Details
Adding shading and details is what will give your drawing depth and realism. Start by shading with simple strokes, gradually increasing the pressure as you go over each area multiple times. If using pencils, use different grades of hardness to add texture. To add further detail, use hatching lines in different directions or cross-hatching for darker areas. You can also use stippling (small dots) for softer textures like skin or hair. Finally, erase any unnecessary lines or smudges to give your drawing a clean finish. With practice and patience, you can make your drawings look amazing!
Shading the Strawberry
Shading is an essential process in strawberry production. It helps to protect the plants from direct sunlight, prevent heat stress, and reduce the risk of disease. Shading also helps to keep the soil cool and moist, which helps to promote healthy growth of the plants. A properly shaded strawberry garden can yield higher yields and better quality fruits.
When it comes to shading a strawberry garden, there are several options available. One option is to use shade cloth or other types of material such as burlap or plastic sheeting. This type of product is easy to install and can provide adequate protection from direct sunlight while still allowing some air circulation.
Another option is to use trees or other natural shade sources such as hedges or even man-made structures like arbors or pergolas. Trees are a great choice because they provide good protection from direct sun while also providing some habitat for beneficial insects that help pollinate the plants. Hedges are a good option for smaller gardens because they can be shaped into different shapes and sizes depending on what you need for your particular garden design. Arbors and pergolas can add a nice aesthetic touch while also providing some sun protection for your strawberry garden.
No matter which type of shade you choose, it’s important to make sure that you install it correctly so that it provides adequate protection from direct sunlight without blocking out too much air circulation or light for the plants. It’s also important to make sure that your chosen shade isn’t blocking out any water sources such as rain gutters or water runoff from nearby buildings or sources.
Shading your strawberry garden can go a long way towards ensuring healthy plant growth and higher yields of good quality strawberries each season!
Color the Background
Adding a splash of color to your background is a great way to make your space more personal and inviting. Whether you’re looking for a subtle hint of color or something bold and bright, there are lots of options when it comes to painting your walls. The most important thing is to choose colors that make you feel comfortable and bring out the best in the room.
When choosing colors, it’s important to take into account the existing furniture and décor in the space. Consider what colors will complement the items you already have, as well as how much natural light enters the room. Natural light can dramatically change how a color appears on a wall, so be sure to test out swatches in different lighting before committing.
If you’re feeling overwhelmed by all the choices, start by selecting one main color for your walls. From there, you can add accent colors with furniture or accessories to complete the look. You can also use different shades of one hue to create an ombre effect or try painting geometric shapes on your wall for something more unique.
No matter what colors you choose, don’t forget that painting is always reversible and doesn’t have to be permanent. So don’t hesitate to experiment with different looks until you find something that speaks to you!
Create a 3D Effect
Creating a 3D effect in your design can be a great way to draw the eye and capture attention. Depending on the type of project you are working on, there are a number of ways to create this effect. A popular technique is to use shadows or gradients to create an illusion of depth in your design. By adjusting the light and shadow angles, you can create a realistic 3D effect that stands out from the rest.
Using layers is another option for creating a 3D effect in your design. By stacking or layering elements, you can add dimension and create an interesting visual effect. When using layers, it’s important to keep the elements balanced and use consistent spacing between them. This will help ensure your design looks cohesive and professional.
Textures can also be used to create a 3D effect in your designs. Whether it’s wood grain, metal, or fabric textures, adding depth with textures will give your design more visual interest and help it stand out from the crowd. Using subtle details like texture will also draw attention to certain areas of your design, allowing you to highlight important content and draw viewers in.
No matter which technique you use, creating a 3D effect can be an effective way to give your designs more dimension and make them stand out from the rest. With careful planning and attention to detail, you can create amazing visuals that grab attention and make an impact on viewers.
Use Different Markers & Tools
Markers and tools are essential to any creative project. Using different types of markers and tools can help create different effects, which can be used to enhance the overall look of a project. For example, a thin marker can be used for outlining details, while a thicker marker can be used for filling in larger areas. Different colors of markers and tools can also create interesting visual effects. Additionally, using various types of tools such as scissors, rulers, or stencils can help to achieve desired results in projects. With these different markers and tools, you can easily add complexity to your projects and create unique works of art.
Different surfaces also require different markers and tools in order to achieve desired results. For example, when working on a canvas or paper, markers with very fine tips are best suited for intricate details. On the other hand, when working with wood or metal surfaces, thicker markers may be necessary in order to get even coverage over larger areas. Additionally, when using certain materials such as clay or foam board, specific types of tools may be necessary in order to achieve desired shapes and textures.
Using different markers and tools is an important part of any creative project. By experimenting with different types of markers and tools available on the market today, you can easily find the right combination that will work best for your particular project. With the right combination of markers and tools at your disposal, you’ll be able to create unique works of art that will stand out among the rest.
Conclusion
Drawing strawberries step by step can be a fun process that results in a realistic, three-dimensional fruit. By starting with basic shapes and then adding details like shading, highlights, and shadows, you can create a realistic image of the strawberry. With practice you’ll be able to draw all kinds of fruits and vegetables that look like they came out of a still-life painting!
Remember to always draw lightly when sketching out the shapes so that you have room to make mistakes. You can also refer back to the reference photo if you don’t know where to start or get stuck. I hope this tutorial has been helpful in showing you how to draw strawberries step by step. Happy drawing!

